
Bushcraft is a word that gets thrown around very often in the survival community, but it’s also a word that far fewer people understand it.
A truly skilled survivalist is someone who can use resources provided by nature exclusively to survive.
Bushcraft will teach you skills not just to survive, but to thrive in comfort, and rely not on your gear, but yourself.
This is a list of the most important wilderness survival skills you will need to survive in the wild.
Finding and Purifying Water
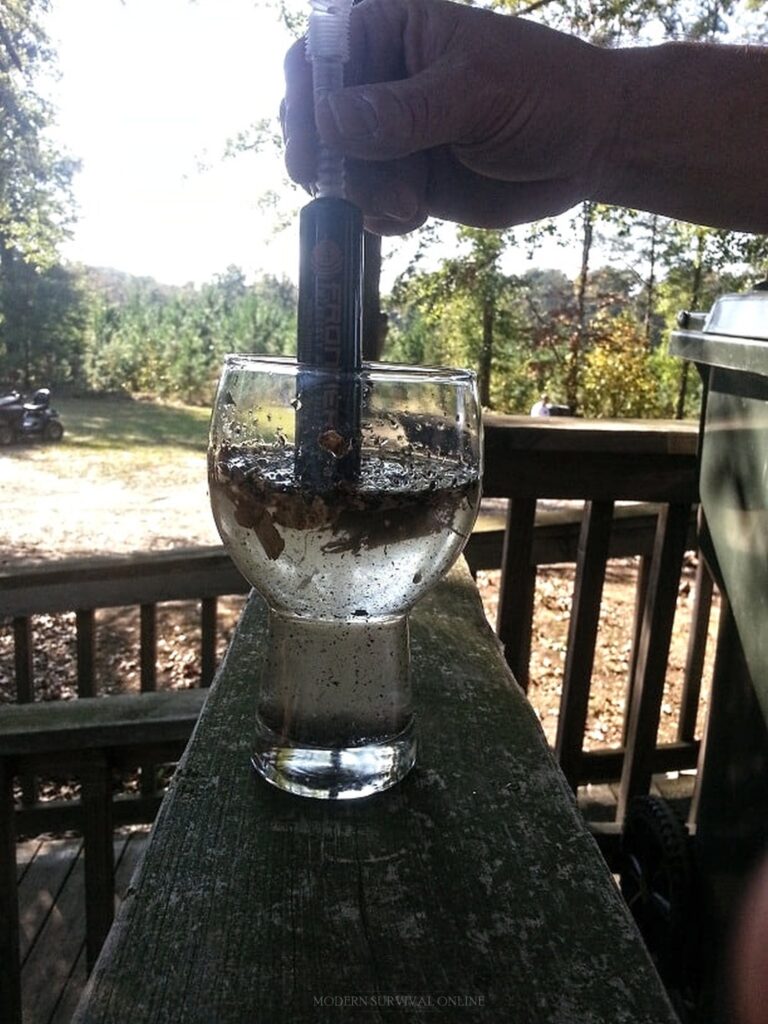
Water is almost certainly the very first thing to worry about when learning bushcraft. The rule of three gives you a maximum of three days without water, which goes down to one in very hot, arid conditions.
Remember that even once you have found water, in most cases it will then need at least to be filtered and possibly distilled or boiled before it is safe to drink.
Finding water is often just a matter of understanding your surroundings well, such as knowing that water flows downhill, so valleys and gullies are always a good start.
Humans are only animals, and all other animals need water too, so following animal trails or watching for birds flying quickly (they fly slower after drinking, because they are heavier) are also good strategies.
There are many, many different ways to purify water, and there is not space here to do justice to all of them, but suffice it to say that filtering will remove only the larger particles, distilling will get rid of smaller stuff, and boiling will kill bacteria. Sometimes all three may be needed.
Finding Food
When you visit an external link on this page and then make a purchase, I may earn a commission. Read my full advertising disclosure here.
There are three ways to find food in the wild: foraging, hunting and trapping. Foraging is by far the easiest to learn, and is likely to produce the most reward. Learn what plants you can eat, and how best to cook them, but be very careful of lookalikes and mistakes.
It is best to take a knowledgeable guide out with you at least for your first few trips, and to begin with ingredients and recipes which are simple and well known, like nettle tea and blackberries. Richard Mabey’s Food for Free is an acknowledged Bible for foragers.
Remember that bushcraft is not an ‘all or nothing’ venture’, it can be whatever suits you, so starting off by trying recipes out at home, and then only cooking what you are confident with in the bush is a good way to go.
With all foods, but especially in the case of mushrooms, be very careful to only ever eat what you are absolutely certain is safe.
Try to get off the beaten path, because the passage of many often obscures or kills plants, and fungi especially are very delicate.
After foraging, trapping is the next most reliable source of food. Learn first to make a few good traps.
Remember that one of the most important things when trapping is to know your quarry, so go out and learn, not just about whatever you want to eat tonight, but also about its environment, where it’s likely to be, what might get to the trap first and so on, and try to factor this into your considerations when building traps.
Finally, there is hunting. Hunting is certainly the ‘coolest’ but also the least efficient way of getting food, and is best suited to large, wild game which it is unrealistic to trap safely and must be killed from a distance.
Even in this case, the best course of action may still be to construct a trap to keep the animal immobile, and then approach and kill it from afar with a ranged weapon such as a bow or spear.
On the other hand, this approach requires that the hunter checks all their traps very regularly, to avoid inhumane treatment of animals, or losing their quarry to another predator.
If you do decide to hunt directly, obviously ranged weapons are the far preferred choice. What you choose depends on your style of bushcraft, but most people will be going for some kind of bow.
Once you have made this decision, the most important thing is the welfare of the animal as it dies.
Bowhunting is great for both small and medium game like deer, and you may be perfectly happy with the ethics in principle, but surely a quick, clean death is preferable to a slow, dirty one?
Make sure you are using the appropriate arrows and a strong enough bow to kill the animal as quickly as possible, and of course make certain that you will only hit an animal, not any people who might be in the vicinity.
Train hard first, practice in your backyard, then on static and (if possible) moving targets in the woods, before attempting to hunt for game. If you get advice and help from a more experienced hunter then always heed it!
In the case of both hunting and trapping, it is wise to follow the Native Americans, and try to use as much of the animal as possible.
The primary reason for hunting is meat, but animal skins are a classic of bush tailoring and can be stitched with sinew of the same carcass. Antlers and bones make good tools (including needles), fish hooks and knapping strikers.
Making and Using a Fire
Fire Starting methods can be categorized as: strikers, friction, and ‘modern’ methods. Strikers (such as flint and ferrocerium) will last forever (or near enough) but can be tricky to get used to using, and require very good, dry tinder.
With the exception of the fire plough, (which can be useful, but is very labor intensive) all friction methods are drills, which are the most ‘primitive’ of the fire methods.
Most use some kind of wound cord, but you can also use your fingers. Drills are difficult to master and can be very tiring, and only really work in the right (dry) conditions with good tinder.
Once you can build (and build up) a fire, learn and practice building different sizes and shapes of fire, for different uses. For example long, thin fires (which can be made to be much hotter at one end) are the best for cooking.
Native Americans had a saying which went something like:
Red man builds small fire and stays warm, white man builds large fire and stays warm collecting firewood.
There’s nothing wrong with being white, just don’t be white and stupid, build the correct fire for the job, and always clear up and leave no trace.
For longer term living and the beginnings of homesteads, you can also build perfectly good wood-fired ovens and kilns for making baked food and fired pottery.
Practicing pit roasting (where you bury a fire with what you are cooking and dig it up the next day) is also an easy way to learn to cook big, hearty meals, without much advanced field dressing of meat.
Bow Drill Method
The most basic method for starting a fire with materials you can find in the wild is the bow drill method.
This method requires you to collect a flat piece of wood (to serve as the fireboard) with a notch cut into it. You also need a bow complete with a vine for the cord, and a sharpened stick as the spindle.
Wrap the vine around the spindle and place the point of the spindle right above where the notch is in the fireboard.
Proceed to run the bow back and forth very quickly and over an extended period, friction and heat build between the spindle and board. The small shavings of wood will then fall into the notch.
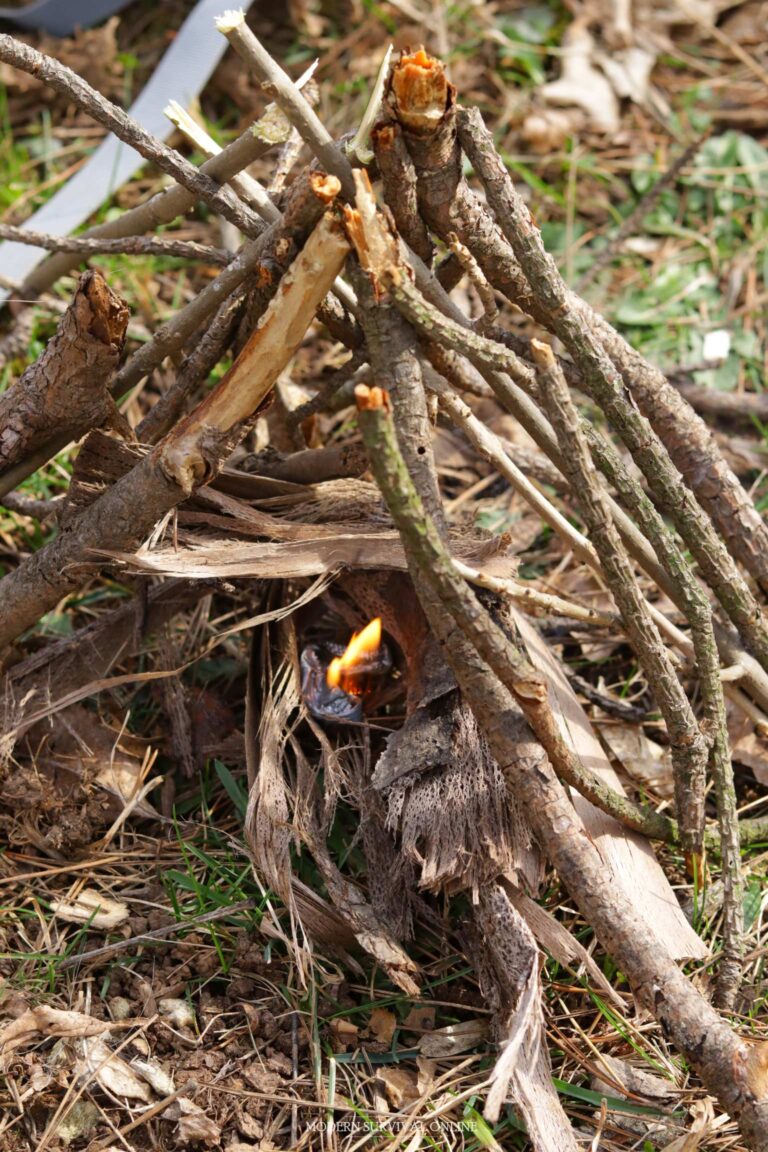
Have a tinder nest already made and different sized kindling on standby.
Once you get an ember or smoke, you can transfer the ember into the tinder next to get your fire started. Proceed to add kindling, and you’ll have a fire going.
The bow drill method may sound easy, but it can be exhausting to do in real life. You never want a true survival situation to be the first time you practice the bow drill method of fire starting.
For this reason, practice extensively now on weekends or whenever you have the time until you become a master at it. That way, it will seem virtually second nature to you in a life-or-death situation.
Tracking
Tracking is an incredibly important bushcraft skill, with applications across the field. Good tracking will of course aid your hunting, but also realize that the flight pattern of a bird or a cloud of midges can lead you to water.
The best way to learn tracking is in the field, by long practice. If possible start with a guide, who can teach you what to look for and ‘how to see’ in the right way, then develop further on your own.
Tracking should eventually become not a skill that you actively decide to use, but a part of how you see the world around you, an awareness of your environment and its mechanics.
Tying Knots
Knots are what allow you to do work with ropes and cordage. A thorough working knowledge of knots can replace a bunch of other tools in a survival situation so long as you have cord or rope at hand!
There are a few general types of knots that a bushcrafter needs to know. Bends are used to join two ropes together. Hitches are used to attach a rope to a solid object.
Loop knots create a loop in the middle of a rope. Slip knots are used to make a quick and secure lashing or snares and Reef knots which are used to tie two pieces of rope together securely.
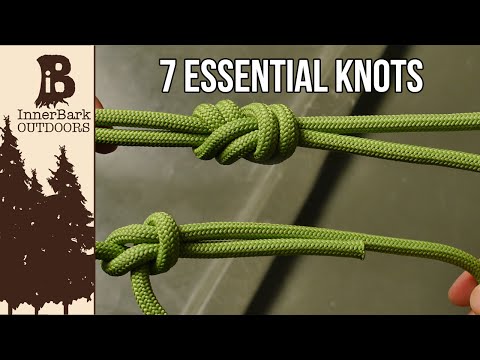
The most basic knot is the square knot. It’s also the most important, because it can be used to create a variety of other knots. To tie a square knot, make a loop with one piece of rope, then take the other piece of rope and do the same.
Now, put the two loops together so that the ropes are crossing each other. Take the top loop and put it over the bottom loop. Now tuck it behind, and pull tight. You’ve now tied a square knot!
There are plenty of other knots you’ll want to learn as well, depending on what you’re using them for. There are knots for tying down gear, knots for fishing, knots for climbing, knots for erecting shelter or securely attaching parts of tools together.
The possibilities are literally endless! But with the square knot as your foundation, you can learn any knot you need.
When it comes to knots, practice makes perfect. The more you tie them, the easier they’ll be to do in a hurry, until the point you can apply and loose them without thought.
The more you do it the better you’ll become at choosing the right knot for the job in a blink. So get out there and start practicing!
In a survival situation, knowing how to tie knots is essential. Here are some of the most important knots every prepper should know how to tie:
Square knot: As we mentioned before, this is probably the most important knot there is. It’s versatile and easy to learn, so make sure it’s one of the first knots you learn.
Clove hitch: This knot is perfect for tying down gear or securing a raft to a dock.
Bowline: This knot is essential for rappelling, rescuing someone who’s fallen, and more. For strength and certainty in all kinds of operations, the bowline is it.
Sheet bend: This knot is perfect for joining two pieces of rope together. Easy to tie quickly and useful for lengthening an existing rope or cord.
Fisherman’s knot: This knot is perfect for tying fishing line to a hook or bait. Strong and flexible!
There are plenty of other knots out there that you’ll want to learn, but these are some of the most important ones. Practice them frequently, and you’ll be able to use them in any survival situation.
Situating and Building Shelters
The title includes the word ‘situating’ because the very first thing to know about shelter is what to build in a given environment, and exactly where to build it.
Learn a variety of different environment-specific types (snow hole, debris hut etc.), and practice, practice, practice! Practicing and learning the little tricks which can only come with experience will make your shelters much better when you need them.
Shelters should also be appropriate to conditions. If the weather looks good and you are only staying for one night, a few sticks and some debris as a heat reflector are enough, but a two week camp in late Fall is obviously a different matter.
Once you have the smaller, faster types of shelter down, invest time and build a more solid structure like a log cabin, or a shelter built into the side of a hill. This is good experience for long term bushcraft, or if you ever decide to set up a small homestead.
Remember not to discount man made shelters. Try out a few different tarps and learn to use them well. Learn the difference between heavy-duty and ultralight and find what you like. If you prefer the heavier side of things, this advice applies more to tents.
Remember also that many countries also have systems of free ‘mountain huts’, such as the bothies in Scotland, which provide free accommodation, and sometimes a fire and basic rations.
Finding your Way
The most basic navigational consideration is to know how to get back to where you started. After that, you also need to know how to get where you are going, and ideally some place of safety in between.
The most important thing is to have a good working knowledge of your environment and its geography, so that even without specialist skills you can have a fighting chance. Look at some maps before you leave, and know where important resources like rivers and public shelters are.
Next is a compass, and knowing how to use it, as well as knowing at all times roughly what direction important places (your home, the nearest place of safety, your shelter etc.) are in relation to you.
From this standpoint, you can use nature to navigate by learning to read the stars, sun and moon, and pick up signals from your environment, like feeling rocks, and using which side is warmer to work out where north is.
First Aid
Often overlooked is the art of what do when things go wrong in the bush, which is surprising given the number of sharp tools and fearsome animals available to cause havoc.
Foraging again comes in useful here, as some plants (most notably the dock leaf) have medicinal qualities, and any non-harmful, large leaved plant can be used to improvise a bandage, at least briefly.
This is probably the only area of bushcraft where unless you have vast experience, and really know what you are doing, you must take ‘non-primitive’ equipment out with you, making sure to cover every eventuality.
Pay particular attention to treatments for injuries from wild animals, as well as serious cuts and bruises (so go heavy on wound dressings and plasters) and food-related illnesses (food poisoning, indigestion etc.).
Do not be afraid to take a big kit with you, it will be worth it one day.
Many first aid organizations such as the red cross offer training courses, and mountaineering and survival schools often do the same for specialist, bushcraft-related first aid. Guidebooks can also be useful, and you can find plenty online and on bookshelves.
Knapping
Knapping is the age-old art of shaping stones into tools. It is a skill that was once common among all cultures but has since been lost to many. However, it is still an incredibly useful skill to know, especially in a wilderness survival situation.
There are two main types of knapping: direct and indirect. Direct knapping involves striking the stone with another object, such as a hammerstone, to shape it.
This is the most common method and is how most people would traditionally think of knapping. Indirect knapping, on the other hand, involves using another object, such as an antler or bone, to apply pressure to the stone and shape it that way.
The main advantage of knapping is that it allows you to create very precise shapes and designs that would be difficult or impossible to create with any other method.
It also allows you to make use of materials that you would otherwise not be able to use or shape, such as obsidian or flint.
The tools that can be crafted by knapping are incredibly useful, and include such staples as knifes, axes, arrowheads and spikes or stakes. With a bit of practice, you can even make more complex tools such as fishhooks or harpoons.
The best way to learn knapping is by watching a skilled craftsman in action. There are many videos online that can teach you the basics.
However, it is important to remember that knapping is a skill that takes years to master. So don’t get discouraged if you don’t get the hang of it right away. Just keep practicing and you’ll get there. The important thing is that you start today!
Learning the technique is one part of the equation, but the other is identifying which material is suitable for knapping. This can be a bit tricky, but with a bit of practice you’ll get the hang of it. The best materials to use for knapping are flint, chert and obsidian.
These are fairly common and easy to find in the wilderness across much of the world. However, other materials can also be used, depending on the situation. Believe it or not, certain kinds of glass can be knapped with care!
When looking for materials, it is important to find a stone that is of the right size, shape and hardness. The size and shape are important because they will determine what sort of tool you can make.
For example, a small, thin piece of flint is better suited for an arrowhead than a large, thick one. As for hardness, the material needs to be hard enough to chip but not so hard that it shatters.
In a survival situation, knapping can be the difference between life and death. With the right skills, you can make all the tools you need to survive. So learn how to knap today and be prepared for facing the bush!
Making Rope and Cordage
Tying knots is only one half of the equation for making rope and cordage work for you in the bush. The other half is, well, making the rope or cordage!
It might seem impossible if you have only given thought to bringing your cordage with you, but as it turns out there are several ways to make strong and useable cordage in the wild.
The easiest way is to use natural materials that you can find in your surroundings. Slender, flexible twigs, vines, and other small plants can all be braided together to form strong ropes or cords. The key is to make sure that the material is sturdy and won’t snap under stress.
Another way to make cordage is by using animal sinew. Sinew is a tough material that comes from the muscles of animals like deer. It can be easily separated into thin strands and then twisted together to create a durable cord.
Finally, if you have some time on your hands you can also make cordage from plant fibers. This process takes a little more work, but it produces a very strong cordage that is perfect for heavy-duty applications.
You can even repurpose damaged fabric or other materials from clothing or packs to make sturdy cordage. Even dental floss can be braided into surprisingly strong lashings and bindings.
Now that you know how to make cordage, let’s take a look at some of the ways you can put it to use in the wild.
Cordage is an incredibly versatile tool that can be used for a wide variety of tasks in the bush. Here are just a few of the ways you can put it to use.
- Building Shelters: Cordage can be used to build all sorts of shelters, from basic lean-tos to more complex structures like wickiups.
- Making Traps: Cordage can be used to make a variety of traps, from simple snare traps to more complex deadfall traps.
- Making Tools: Cordage can easily assemble strong improvised tools like spears, axes, knives, arrows, rafts and more.
- Securing Gear: Cordage is great for securing gear, whether you’re tying down a tarp or lashing together a pack frame.
- Climbing: If you need to climb up or down a steep slope, rope can be used to create a makeshift climbing system.
- Building Fires: Cordage can be used to create a variety of fire-building tools, from simple bow drills to more complex fire starters.
As you can see, cordage is an essential tool for any survivor. With the right skills, you’ll be able to accomplish a wide range of tasks using this versatile material. So make sure to practice your cordage-making skills, and you’ll be ready for anything the wild throws your way.
Trapping
Setting traps will be one of the best things you can do to catch small game without specialized. The beauty of setting traps is that you can tend to other duties related to your survival while you wait.
Examples of traps you can set include the simple noose on a small game trail, and the deadfall.
Since fish can be a great source of protein in a survival situation, you should also learn how to set fishing traps, such as the Weir trap, or how to set up a wall on a shorter section of the stream to not allow the fish to go any further.
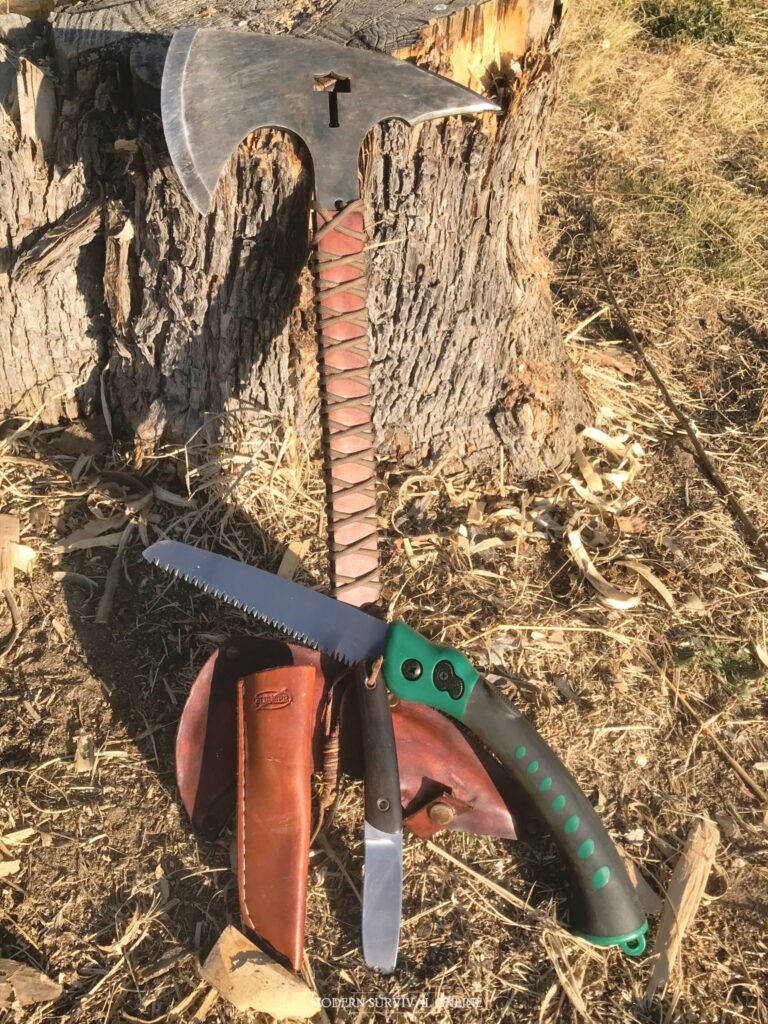
Proper Tool Usage
Most preppers already know that having the right tools on hand can make all the difference when surviving in the wild. Axes, hatches, saws, knives and more.
But what they might not know is that it is the proper, safe use of those tools that is paramount. Knowing how best to employ your tools without injuring yourself and without unduly wearing them out is imperative for survival.
For the most part, these skills are common sense. But we’ll go over them anyway so that there is no confusion.
First and foremost, always maintain a safe working environment.
This means keeping your tools clean and in good repair as well as making sure that your workspace is as uncluttered and organized as possible under the circumstances.
A sharp hatchet is much less likely to cause an accident than a dull one, and a cluttered workspace can easily lead to lost fingers.
Next, be sure to use the proper grip when using your tools.
This will help you to maintain control and avoid injury. For instance, when chopping with an axe, keep your fingers well away from the blade and grip the handle with both hands, placing one hand higher on the shaft than the other for more leverage.
Try to keep your hands dry and your grip on the tool certain. Ensure the rest of your body is out of the way should the tool recoil or deflect on impact.
When using a knife, always cut away from yourself. And when whittling or carving, always use a sharp knife; a dull one is more likely to slip and cause an injury.
Grip the knife in your dominant hand and hold the object you’re carving in your other hand, keeping your fingers clear of the blade.
If you must cut toward yourself, pull the knife toward you by the spine using finger strength alone instead of pulling with your whole arm. This will help limit the travel of the edge in case the blade slips and lunges unexpectedly.
When using a saw, make sure the teeth are facing in the correct direction for the cut you’re making. Align the material to be cut with the saw blade and use a pushing rather than a pulling motion.
Sawing with a dull blade will only cause you problems, so keep your blades sharp! Use the greatest possible care when sawing off any branch that is still attached to a tree as it can fall or swing unexpectedly.
Maintain Your Tools and Gear
One of the most important aspects of bushcraft is maintaining your tools and gear. This means keeping them clean, sharp, and in good repair.
Good tools make work easier and more efficient, but tools that are used, abused and barely functioning will do the opposite!
A dull knife, for example, will make it difficult to properly skin an animal, or cut through vegetation. A blunt saw will take longer to cut wood, and a chipped hatchet can make it difficult to split logs.
It’s important to take care of your tools not only so they’ll work better, but also so they’ll last longer. In a survival situation, you may not have the luxury of being able to replace a broken tool.
Taking care of your tools is not hard under the circumstances. Keep them clean. Wipe off your tools after each use with a clean cloth. If they’re particularly dirty, you can wash them with water. Keep them sharp.
A sharp knife is safer and more effective than a dull one. Sharpen your knives and other edged tools regularly with a honing stone or other sharpening tool if you have it.
Keep them oiled. Oiling your tools helps to keep them in good condition and prevents rust. Animal fat and plant oils can be used in place of our usual choices. Repair them when necessary.
Don’t wait until a tool is completely broken to fix it. Address minor issues as they arise so they don’t become major ones later on. A tool that fails catastrophically in use can severely injure you, something you cannot afford in the bush!
In addition to taking care of your individual tools, it’s also important to take care of your gear as a whole. Your gear is anything else that helps you survive. It keeps you warm, dry, hydrated and safe in the wilderness.
Some tips for taking care of your gear. Keep it dry. If your gear gets wet, dry it off as soon as possible. Wet gear can quickly become moldy and will be less effective at keeping you warm and dry.
Keep it clean. Dirty gear can be a breeding ground for bacteria and other harmful organisms.
Clean your gear regularly with water and soap if you have it. If not, scrub it off with sand and then rinse again. Store your gear properly. Don’t let it sit out in bad weather if you can avoid it.
Take care of your bushcraft tools and gear and it will take care of you!
Sewing
Sewing is an incredibly versatile yet underrated bushcraft skill that can be used in a number of ways while surviving in the wild. It goes hand in hand with employing natural resources like animal pelts, scavenged or repurposed fabrics and so forth.
For making large fabric panels or other “sheet” goods you’ll need to learn how to sew. Sewing is best done with a dedicated sewing kit containing needle, thread and all the other associated gear but it can work just as well using field-crafted needles and improvised cordage.
For example, you can use sewing skills to:
- Create shelter: By using your sewing skills, you can create a variety of different shelters that will keep you warm and dry.
- Make clothing: In addition to keeping you warm and dry, clothing can also help protect you from the elements. Knowing how to sew might be the difference between having clothes appropriate to the conditions or suffering exposure!.
- Fix gear: When you’re out in the wilderness, your gear is going to take a beating. But with some basic sewing skills, you can often repair it and get it back up and running.
- Make traps: One of the best ways to catch food in the wild is by using traps. Sewn trap components like nets, pouches and the like ca be tailored for large and small game alike and provide capability that is not easy to improvise in any other way.
- Make luggage: You’ll always have need of bags and other luggage in a survival situation. For carrying tools or extra food, even something as simple as an animal hide bindle on a sturdy branch or a drawstring leather pouch can help you tote a lot of supplies for very little effort.
Don’t fall into the trap of thinking that sewing is just some hobby for grandmothers! Sewing skills will allow you to create using natural or synthetic fabric, or fix your clothing and other gear. Both are important when surviving in the bush.
River Navigation
In a survival situation, being able to navigate rivers is an essential skill. It can be the difference between life and death.
There are two main ways to navigate a river. The first is by using a boat or raft. The second is by crossing.
If you have or craft a boat or raft, you can use it to travel downstream. This is the easiest way to navigate a river.
If you have a good understanding of the region you are in and the river itself it might serve as a highway that can take you closer to civilization or even get you rescued.
However, if there are no boats or rafts available but the river remains an obstacle you’ll have only three choices: Stay on your side. cross it some other way or swim it.

If you decide to cross a river, there are two main methods you can use: the wading method and the bridge method.
The wading method is the safer of the two methods. To do it, you’ll need to find a place where the river is shallow. Then, you’ll need to walk across it.
Be careful not to step on any rocks or branches that might be in the water. The current may be strong, so stay close to the shore.
The bridge method may be safer than wading or swimming but you’ll still need to be careful. To do it, you’ll need to find a place where the river is spanned by a tree trunk or boulders. Make sure the bridge is strong enough to support your weight and be damn careful that you don’t slip.
If you cannot cross by any other means, you’ll have to consider swimming it. This is far more difficult and more dangerous than using a boat or raft, or by crossing at shallows on foot, but it’s still possible to do it if you know how.
First, you’ll need to find a place where the river is calm. Then, you’ll need to enter the water and swim across. Be careful not to exhaust yourself. If the current is too strong, you risk drowning.
Creating or using anything that float and afford you some buoyancy is a great idea. Also take care to waterproof any sensitive gear using a drybag, trash bag or something else.
Rivers are found throughout most parts of the world, and they may be a welcome sight or an imposing obstacle.
Know that they can definitely help you in the bush if you know how to make use of them. In any case, if you must cross a broad, fast river you must know what you are doing!
Practice Makes Perfect!
As we mentioned earlier, a true survival situation should never be the first time that you use any of these skills. You want to be already proficient and confident in your skills when the time comes to put your skills to the test in a life-threatening situation.
The best way to truly learn ‘bushcraft as a whole, is to mix these skills together.
For instance, you might take a weekend to learn more about outdoor cooking, and eat only food from the wild cooked on an open fire.
The point is to not treat these skills in isolation, but as parts of a single ability to live independently in the wilderness.
last update on 03/22/2022
Like what you read?
Then you're gonna love my free PDF, 20 common survival items, 20 uncommon survival uses for each. That's 400 total uses for these dirt-cheap little items!
We will not spam you.
Bushcraft skills are extremely important to have. That is why after my family was impacted by Hurricane Katrina, I have made sure to teach my two children many of the skills that you have listed in your article. Prepping is so important because we never know what might happen and what resources we may or may not have access to. Of course, it would be ideal if we had some cheesecloth and bleach around after a disaster hits to purify our water. But, if we don’t, knowing how to make a fire and boil the water we have access to can save our life. Thanks for the tips and the links to other resources!
If you have some rural property (or know someone who does), build a low tech shelter there now, or at least pre-position supplies for building one on site. A cast off above ground pool that developed a leak and will be thrown away makes a good beginning for a short yurt, for example. A metal cattle panel, with round perimeter formed from steel ‘T’ posts to serve as the wall support. Install pool bladder upside down over structure – done. A slightly taller T post in middle for water to slope away from center would be a good idea.