
by Matthew
In the wilderness, fire is your best friend. It cooks food and sterilizes water. It dries wet socks and lifts sunken spirits.
Fire is comfort in the dark when every night sound beyond camp is something lurking. But when you’re out of cotton balls and esbit tablets fire won’t cut you a break.
And if you intend to survive, no matter the odds, you need to know how to find and use the fire starting tools available all around you.
We’re talking wild-foraged tinder and kindling – the bushcrafters’ bread and butter.
Tinder vs Kindling
Before you trundle off into the brush to practice the timeless task of producing fire, it’s important to know what you’re looking for.
When it comes to producing fire with nothing but natural materials and a ferrocerium rod (ferro rod) you’ll need two main things: tinder and kindling. Without one, the other is just about useless and you’re in the dark. So, let’s define.
Tinder is dry and fluffy – the stuff of any good fire. It’s where the first flicker of flame or white smoldering wisp comes into play. Tinder can be simple dead, dried grass and leaves or processed fungi. Finding tinder is the first step to making fire.
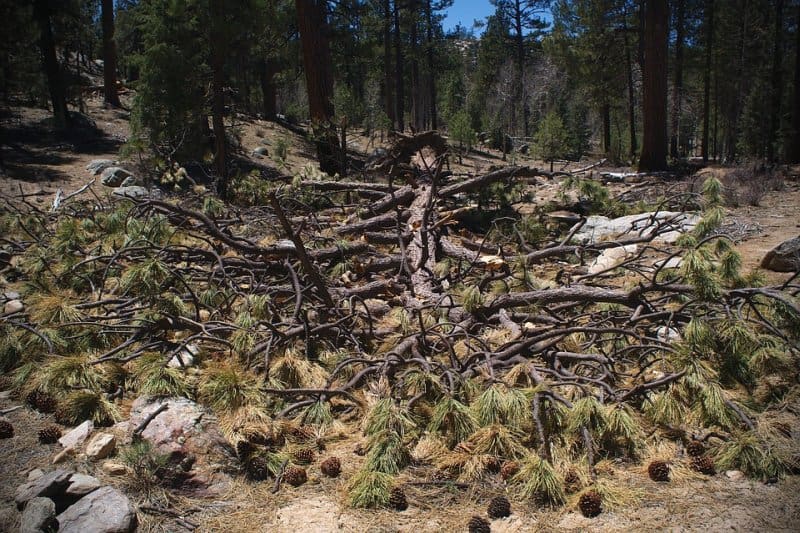
Kindling is step two. It’s what catches the flame or coal produced from tinder. Pine needles, twigs, or torn up bark can all be kindling. It’s the material that’s too big for a spark to light and too small to efficiently sustain a fire. Kindling brings your fire from a little flicker of heat to big licking flames so essential to survival.
Wet or dry there are common materials in your neck of the woods that, with a little know-how and a few simple tools, can produce all the heat you need to stoke a fire. All materials covered will light with nothing more than sparks. But if you have a lighter or matches – all the better.
Tinder

Dried Plants
Let’s start off simple with one you probably already know. If the weather’s been dry lately you’re sure to find more than enough dead and dried plant matter to start a fire. Dry grass, ferns, and leaves can make great, easy to find tinder with just a little processing.
Collect about twice what you think you’ll need and tear your tinder into thin strips and bits. Once broken down, collect a hefty handful, and rub vigorously between your palms over your intended fireplace. The intent here is to break the dead plant matter down as fine as possible. You’re looking to make a palm-sized pile of torn strips, bits, and even dust. Now, bunch this pile together and form a little divot in the center. Place the end of your farro rod in the divot and rain down a generous shower of sparks. With a little persistence, the sparks should catch and flame will spring up.
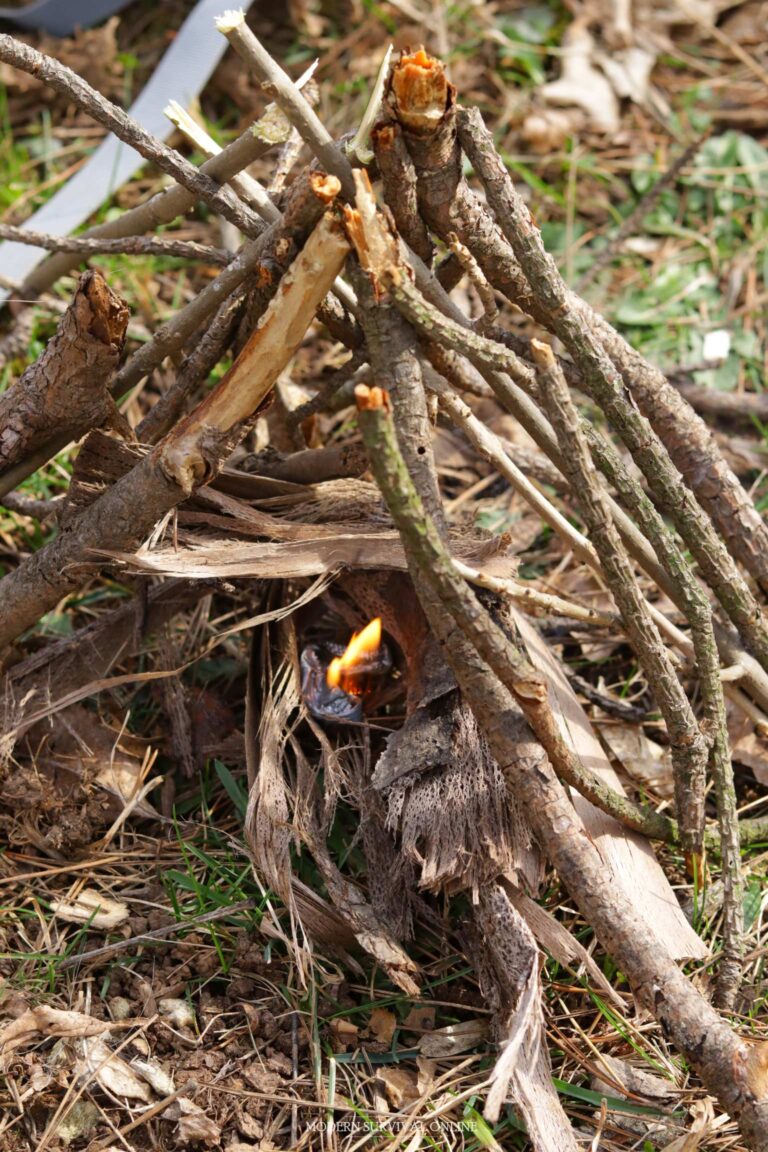
Additionally, dried plant material can be used in combination with tinder that, instead of bursting into flame, smoulders. In a situation where you have a smouldering type of tinder such as tinder fungus, chaga, or milkweed ovum (included later in this article) you will make what is called a bird’s nest. A bird’s nest is a simple and easy way to produce fire from the smallest smouldering ember – even the gray remains of a long-extinguished campfire.
To make a bird’s nest, gather two generous handfuls of dried plant matter as if you were going to use it as the tinder itself. Separate the pile and loosely sandwich your ember within the pile. Now, with patient, constant breath, blow into the bird’s nest. Keep blowing until you see smoke. At this point, you need to be ready to put the bird’s nest gently down and introduce kindling. Keep blowing until the smoke thickens and flame springs up.
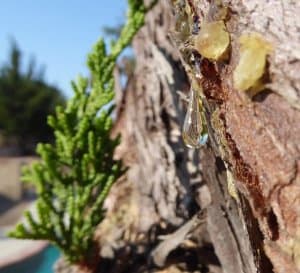
Sap, Pitch, and Resin
There are technical differences between sap, pitch, and resin but there’s no need to get into it here. They are common terms we all understand. And they burn no matter what you call them.
Unlike many of the sources on this list, there is no sure-fire way to find sap. This tacky tinder is produced when a tree is damaged or cut. You’re most likely to spot sap while searching for some other tinder – so keep your eyes open.
Freshly fallen or damaged conifer trees are your best bet. Look for cloudy yellowish sap dried to the outside of the tree near a broken branch or damaged bark. It should be hard or even tacky to the touch. Like dried plant material (and all fire-related materials), gather more than you think you’ll need. Any sap seeping from the tree is already lost, so don’t worry about harming the tree. For the purposes of starting a single fire, a quarter-sized dollop should do. Touch the sap with some sparks or a flame and watch the fire spread.
Sap burns hot and slow, so it’s a great tinder to use if you’re working with wet materials. Damp pine needles or pine cones will dry out enough to light when used in combination with sap. And unlike many tinder sources, sap is easy to store. Just roll it into a ball and wrap a leaf around it. But remember, once you light a bit of sap there’s no going back. It will turn to liquid as it burns so only light what you need and save the rest.

Common Reeds
The feathery seed heads of common reed plants are dry, fluffy, and eager for a spark. You’ll find them growing tall in and on the borders of wetlands, swamps, and other soggy terrains. Common reeds like to grow in large beds of shallow water.
Like many of the other types of wild-available tinder on this list, you don’t need to worry too much about finding the exact type of plant. Just look for tall stocks (around six feet tall) with flat, pointed leaves that, along with the feathery seed heads, are so light that they follow the direction of the wind.
When it comes to fire starting, this one’s easy. Just lay a seed head down where you’re making a fire and throw some sparks into it. The seed head will catch flame and burn at a medium rate giving you plenty of time to add small kindling.
Unless you have quite a bit of it on hand, the common reed is not ideal when used with wet kindling.
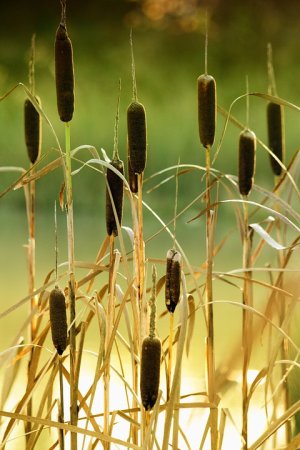
Cattail
This is one plant that just about anyone can identify. Cattails grow aggressively in marshes, swamps, and other wetland environments. Their unique solid brown sausage-like head on top of a pinky-finger-thick stock is easy to spot for even the most green of bushcrafters.
The stuff you’re looking for is the fluffy seed material inside the plant head. You’ve no doubt seen this drifting through the air on a windy day near a swamp. But once you’ve spotted your cattail, don’t rush over and start picking the plant apart straight away.
The dry, white, and fluffy material you’re after is tightly compressed within the firm seed head. When the seed head is broken the tinder inside doesn’t come peacefully. It bursts out in a fluffy bloom that, if you aren’t careful, will fly away with your chances of starting a fire.
Instead of pulling out the tinder there at the swamp’s edge, collect two or three seed heads and bring them back to camp. Cattail is especially portable and an extremely competitive grower, so don’t worry about damaging the ecosystem by taking too much back to camp.
Cattails are one of the many forms of flash tinder. Flash tinder, unlike heavier, more hearty tinders, burns in the blink of an eye. So, you will need something to catch that fast flame. Torn up birch bark, dead leaves, pine needles, or some other dry and easily-lit material is the best.
When you’re ready to start your fire, break open the cattail and spread a wide, thin layer over your fireplace. Sprinkle the supplementary tinder all over the cattail and shower down some sparks. You’re going to need to be quick here. The cattail will combust, flare into flame, and go out. One or more pieces of the scattered heavier tinder will catch and hold a flame. If you’re quick, you can snatch up the remaining unlit pieces of tinder and feed this newborn flame. Additionally, you can prepare a small pile of dry plant matter and add it to the small flame.
Cattail can be a bit stressful to use as it is quick and unforgiving. However, it is both abundant and virtually impervious to whatever the weather has in store. The tight-packed fluffy seeds stay bone dry so long as you pull them from an unbroken part of the head. With a little practice, cattails will do the job every time.
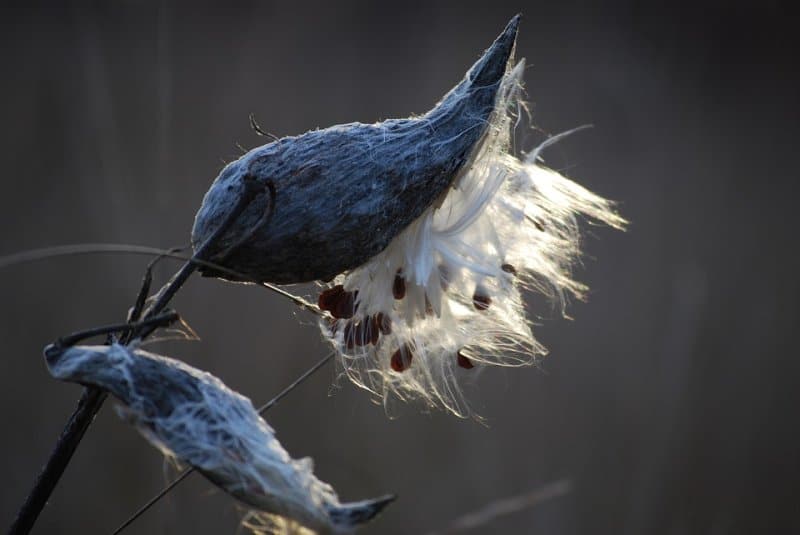
Milkweed
This extremely common perennial can be a fantastic late-season tinder source. Milkweed grows in disturbed areas like roadsides, railroad tracks, and agricultural fields so locating its natural habitat is no trouble. Additionally, identifying this plant is also quite easy. Milkweed can grow to over eight feet tall and its thick green stock is lined with opposite rows of broad, flat leaves. If you’re not sure that you’ve found a milkweed plant, just snap a piece of the stem and look for the white milky sap that gives the plant its name.
Unlike many of the tinders on this list, the usefulness of milkweed depends largely on the season. The teardrop-shaped seedpod, while still green in August and throughout the summer, is no good for tinder. However, once fall/winter rolls around, the milkweed seed pod will have dried up. Now it’s ready to use.
Milkweed can be used in two different ways. The feathery white filaments within the seed pod can be used as a flash tinder just like cattails, while the dried seed pod ovum (the walls or casing which make up the pod) can be showered with sparks and set to smoulder. So don’t worry if you manage to locate a milkweed plant only to find all the seeds scattered to the wind. Just build yourself a bird’s nest and use the smoldering milkweed ovum to blow a fire to life.
As a note of caution, be careful when searching for and harvesting milkweed. Their colorful and complex flowers are a main sources of food for wasps and bees. And keep your eye out for the beautiful monarch butterfly that flocks to feed on milkweed every year.
Fatwood
This tinder is both one of the best to use and the most challenging to prepare. It is a very technical tinder, but once you know how to find it, you’ll be on the look out on every hike.
Fatwood is the product of a dead conifer tree. In a fruitless effort to sustain itself as long as possible, the evergreen will pull all of its life-giving sap deep within itself. This processes creates inner areas of supersaturated material, full of wonderful smelling sap.
To find and retrieve fatwood, first locate a fallen evergreen tree. The older the better. Even wet, punky wood so rotten that it crumbles in your hand. The longer the tree has been down and decomposing, the more concentrated the fatwood.
Now that you’ve found your downed conifer tree, look for a good thick limb – the thicker the better. The highest concentration of fatwood is found in the very center at the base of a limb where it connects to the trunk. If you can break the limb off with your hands, great. But don’t risk injuring yourself and making matters worse in a survival situation if you don’t have to. Use a saw, axe, or batton with your favorite bushcraft knife to cut the limb away as close to the trunk as possible.
Now, cut away the outside bark and wood of the limb – or crumble it in your hands if it’s rotten enough. You’re looking to expose the center of the limb. You’ll know you’ve found fatwood when you see deep-crimson wood and smell the strong odor of pine pitch. Continue working with the limb – cutting away all of the bark and rotten punky wood.
Once you have your fatwood exposed you’re ready to process it. Use an axe or batton with your bushcrafting knife to split the wood. Quartered is best because you are looking to produce a clean sharp edge along the length of the fatwood. Now that you have a sharp corner on the wood, scrape the point with the back of your knife to produce thin curls of fatwood. Once you have a golf-ball-or-smaller sized pile of fatwood, send a few sparks down on top and watch the fire spring to life.
Fatwood will burn hot and slow no matter the weather. So if it’s been raining for a week and you can find a downed conifer tree, feel confident that you can start a fire with a bit of hard work. And don’t worry if the tree looks too long gone. The more wet, rotten, and falling apart the better. Inside is a vein of one of your best fire starting friends.
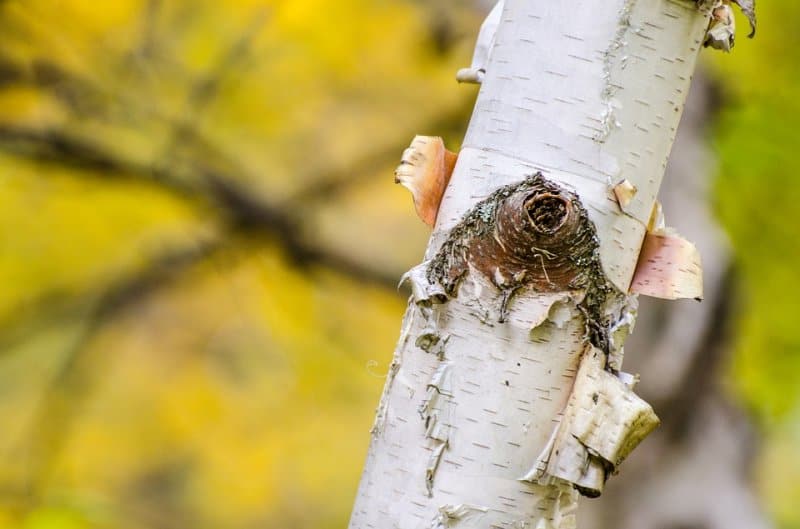
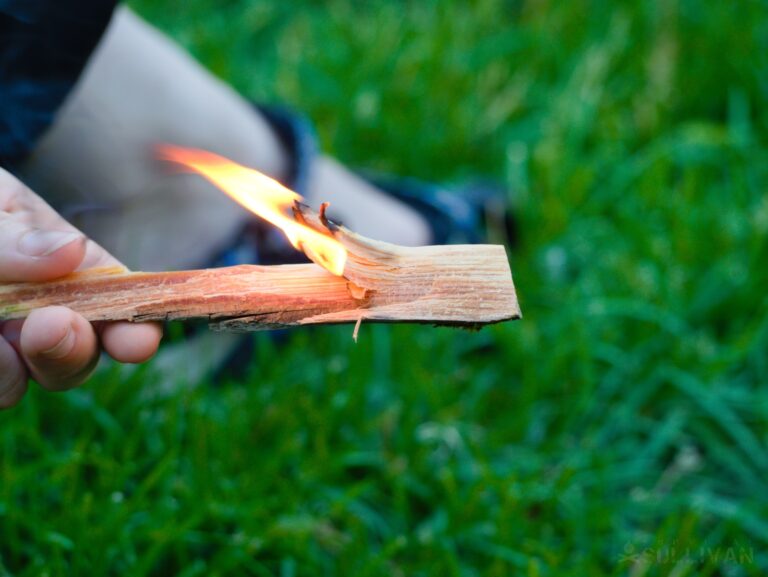
Birch Bark
Of all the wild-foraged tinders on this list, birch is the easiest to identify, process and use. If it’s dry, you really can’t go wrong.
Birch trees grow just about everywhere but you should avoid harvesting bark from live trees. Just keep your eyes open as you walk through the woods and you’re sure to spot a fallen tree or a sheet of the distinct white and papery bark.
There are two main ways to use birch bark as a tinder: curls and dust. To use birch bark in curl form, simply tear some bark into pinky-fingernail-width (or smaller) strips. Now, take each strip and wrap it tightly around your index finger, using your thumb to hold it tight for a few seconds. This isn’t anything terribly technical. All you’re trying to do is make little curls instead of straight strips. Strips of bark curling up on themselves and tangling with other birch curls simple give the fire a better chance to spread. There is plenty of air amidst the pile of torn bark and one lit piece is more prone to spread to the others curled together.
A generous showering of sparks from your farro rod or a quick touch of a match with quickly light your birch bark tinder alight. This process is the most simple way to use birch bark, but it is also the least economical as it burns up all the bark in the process. To make your birch bark tinder last for a dozen or more fires, make some dust.
To make birch bark dust, take a piece of birch bark and lay it flat on a hard, safe surface. White side up or down – it doesn’t much matter. Next, secure the bark with your thumb and fingers, leaving an open area of bark between. Carefully, and with gentle pressure, scrape the blade of your knife back and forth on the surface of the bark. After a few seconds of scraping you will see light brown dust begin to collect on the surface.
This is where you need to be very careful. Yes, watch out for your fingers with a knife working so close. But with such gentle pressure, you should have no trouble controlling the blade. The care you need to take is in not disturbing the dust. Birch dust is extremely light. Even the most gentle breath can blow it away. A jostle of the hand or slip of the knife could scatter your pile. But if you’re careful you will have a nice penny-sized pile in 30 second to a minute.
Scrape the dust into a pile with your knife and get your farro rod. Be careful that the bark doesn’t curl up and scatter the dust – birch bark like to curl. Now, being careful not to scatter your pile, place the end of your farro rod against the bark right at the edge of your dust pile. This is the bit that takes a bit of practice. Without driving your striker down into the dust pile and scattering it, scrape sparks down onto the dust. It will smolder and light into a small flame.
Catch the candle-sized flame on the end of a curled strip of birch bark or other tinder, add it to your other tinder and kindling on standby and extinguish the rest of the burning dust. If you’re quick, you can put out the burning dust before it burns through the piece of birch bark. With a little practice you’ll be able to go through this process several times with the same piece of bark. And once you’re sure it’s totally extinguished, just pack the bark away for the next fire.
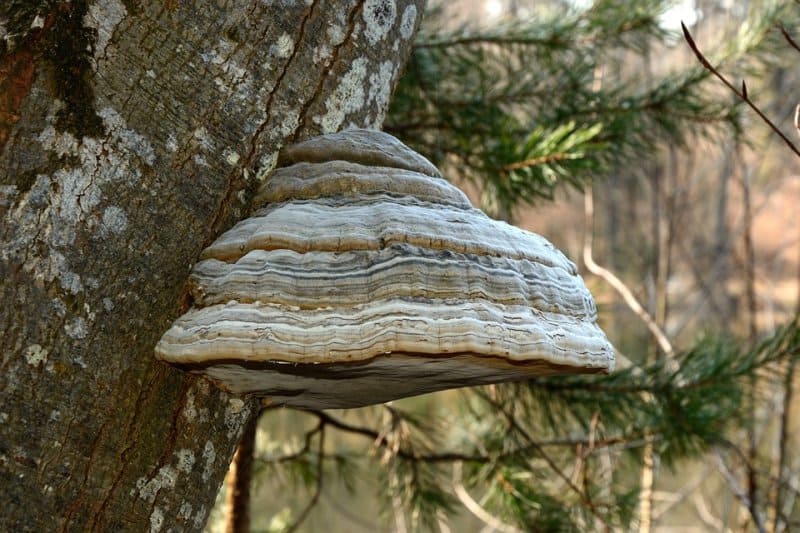
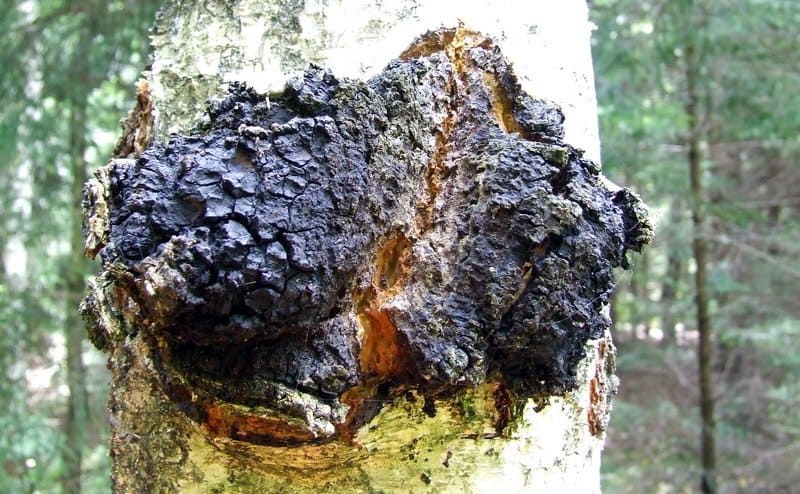
Fungi
There are two main types of fungi common to the U.S. that can be used as tinder. While both work best after a fairly lengthy processing, it is possible to find usable-as-is specimens in the wild. The two type of fungi most commonly used as tinder are chaga (inonotus obliquus or true tinder fungus) and tinder fungus (fomes fomentarius, false tinder fungus, or hoof fungus). Both are used and processed in the same way. However, tinder fungus can be processed even more extensively to produce amadou – a fascinating and highly flammable material. But let’s discuss them one at a time.
Chaga is an ugly-looking black parasitic fungus that grows on birch trees. It’s easy to spot on the birch’s normally white bark and you can feel good about ridding the tree of its parasite. The best way to know if a chaga fungus is mature enough to be useful is to give it a few knocks with the back of your knife. A mature chaga fungus is dark, hard, and woody – giving off a dull almost hollow knock. Once you’ve found a good piece, use your knife to pry or a stick to knock the fungus off the tree.
Normally, the fungus is not yet ready to use. But the ideal conditions you’re looking for are dry and dusty on the inside. You should be able to dig the crumbly inside of the chaga out with your knife and set it to smoulder with your ferro rod.
Tinder fungus is used and inspected for usefulness exactly the same way as chaga, only it looks a little different. This gray or dark brown fungus clings to the sides of trees and goes on living its parasitic life even after the tree has died and fallen. It is easily identifiable by its hoof-like appearance. Additionally, if you want to start a fun project, you could attempt to process tinder fungus into a spongy orange material called amadou. Amadou has been used for thousands of years as a tinder and to make clothing.
It is always good to be on the lookout for chaga and tinder fungus in the woods. However, chances aren’t great that you’ll find a specimen that is ready to use as is. While the process is lengthy – two or more weeks – it is easy. Just let it dry. Take your fingi home and just leave it out for a few weeks. Slowly but surely, it will dry out and be ready to use.
When fully dried, both fungi are a wonderful form of tinder. You can dig out a fluffy pile as stated before or set your farro rod directly on the inside of the fungus and set it to smouldering. Either way, these fungi work perfectly dozens of times when used with a bird’s nest. And what’s even better, if you get a bit of the fungus smouldering you can actually carry it around with you. A speck of smoldering cole within a fungus will stay hot all day. When you’re ready to pack up camp and move on, just get a little bit of the fungus smoldering, and forget it. Next time you make camp and get ready to start a fire just blow a little life back into your ember.
KINDLING
If we attempted to list all the best kinds of kindling to be found in the wild you’d be reading a novel instead of an article. So, instead of exploring different kinds of kindling, let’s discuss the details of what makes good kindling and how to process it in both fair and foul weather conditions. Beyond these details, your judgment will guide you to choose the right kind of materials.
Type of Wood
While some types of resin or oil-filled woods like pine, cedar, fir, and birch are some of the best for kindling, any kind of wood will do. The practicality of kindling has less to do with the species of tree and more to do with the condition and properties of the wood.
Ideally, you are looking for dry, dead wood, ranging in size from your pinky to your thumb. Smaller is OK, but any bigger and you’ll have to do some processing. Kindling should not bend or crumble, but rather snap when broken. When cut or broken, you should see no green, as this means the woods is still alive and full of moisture.
Look for downed trees with intact limbs or broken branches caught on trees or bushes. Any fallen dead wood that is up off the ground will not soak up the moisture from the weather-saturated ground. Even in heavy precipitation standing dead wood will remain dry on the inside.
Processing Kindling
Processing dry kindling is the easiest thing in the world. If it’s the ideal size (smaller than your pinky and up to the width of your thumb) you can easily snap kindling into forearm-or-shorter pieces with your bare hands. However, if you find yourself in a situation in which the only available wood is wrist-thick or larger you’ll need to put in a little extra work.
You can break down larger pieces of wood easily with a saw, axe, or hatchet. Just about anyone with basic survival skills can use these tools. But you don’t always carry a folding saw or axe with you into the wilderness. You do most likely, however, carry a solid bushcrafting knife. And a knife is really all you need.
As a baseline example, let’s say we’re working with an eight-foot-long, wrist-thick branch. The piece of wood could be larger or smaller – it doesn’t much matter. But it’s helpful to have a clear picture in your head. For some reason there’s no smaller wood available so you need to break this piece down into pencil-thin pieces.
Start by breaking the branch into shorter pieces. The easiest way to do this is to find a forked tree, two trees very close together, slim wedge of rock, or some such sturdy V-shaped situation. Stick the branch into the V where you want to make the break. Now, hold fast with your hands, press your chest against the branch, and push the branch perpendicular to the V. You’re using your whole body to put strain on a single point of the limb. So with just a little effort, the limb will snap and your perfectly proportioned piece will fall harmlessly on the other side of the V.
There’s no need to risk injuring yourself by smaking the branch against a hard surface or trying to break it under your foot or over your knee. Just use a little clever leverage and save yourself the sweat.
If the limb is too big to break in this manner, fret not, there is another way. Find a thick, solid, forearm-length piece of wood (for the purposes of batoning, let’s call it a baton), place the blade of your bushcrafting knife where you want to make a cut and hit the back of your knife with the baton. Cut in at an angle, pull the knife out, then cut again at an intersecting angle. Think of it like using an axe. But instead of having all the heavy force of an axe, you’re providing the power with the strike of your baton. This is most definitely a sweat-inducing task but it will get the job done.
Now that you’ve broken down your large branch into shorter pieces, it’s time to split it into kindling. Using the same batoning method as described above, stand the piece of wood up on end (preferably on a hard, safe surface) and place the blade of your knife on the end of the wood. Let the blade hang over the edge of the wood as much as possible. The longer the knife, the better. With a secure grip on the knife, strike the back of the blade. It will bite into the wood. Once the spine of the blade as sunk into the wood, continue striking the part of the blade sticking out the other side of the wood. Continue striking and the knife will split the wood all the way down. Repeat this process, breaking down the wood into smaller and smaller pieces.
Once you have your growing pile of kindling, there is one final step that will make fire starting a breeze.
Create a fire feather. To do this, run your knife at a steep angle down the length of a piece of wood. Using a cut face is best. With a little practice and control, this will produce thin curls of wood. It’s OK if you accidentally cut the curls fully away from the piece of wood, but your true aim is to stop before that happens. An ideal fire feather has these thin curls still attached. When completed your fire feather will have thin curls all around the wood. Creating this fire starting tool will make taking your fire from a small tinder flame to a roaring fire easy.
These method are important to practice not only for a situation in which you can only find large pieces of wood. Being able to efficiently and confidently break down large pieces of wood with just a knife is the best way to produce fire in wet conditions. It doesn’t matter if the rain’s been falling for a week or if a wet and heavy snow covers everything in sight. Wrist-thick and larger pieces of wood will remain dry in the center. Breaking down wood in this method will give you all the fuel you need for a fire. Then, once the fire is going, you can stack the smaller wet pieces of kindling and firewood around to dry.
Fire at Your Fingertips
With a little knowhow, a good bushcraft knife, and a farro rod you can make a fire in just about any situation. The skill of minimalistic fire starting is one that every person should have.
So go out and try a few of these methods. They sound easy. And that’s because the are. Knowing them could save your life.
And of course, this exploration into wild-foraged tinder and kindling is by no means exhaustive. This knowledge is a culmination of one person’s decade of research and practice, but there is always someone out there who knows a trick you don’t. So if you’ve come to the end of this piece and you have a nugget of fire starting wisdom that hasn’t been covered, please leave it in the comments. Survival isn’t just about fending for yourself. Passing down this knowledge is what makes us survivors.

Like what you read?
Then you're gonna love my free PDF, 20 common survival items, 20 uncommon survival uses for each. That's 400 total uses for these dirt-cheap little items!
We will not spam you.
I carry a small plastic bag and gather tinder while hiking. Besides the list of natural stuff, I look for dry card board. Depending where you go, it’s either totally abundant or none existent.
Great article!!!!! If you can’t find/gather get a fire going with the info provided here, you might as well go back home and stay in your jammies!!!!!!!!!!!!