
Any piece of equipment, no matter what it is, no matter how good it might be, is just a starting point. Somehow, someway, it can always be improved. Maybe you spent a lot on a particular piece of gear, or maybe you just spent a little bit.
With most things you get what you pay for, but no matter how much you paid there is no reason to settle for stock capability out of any piece of gear. This is especially apparent when talking about every prepper’s favorite piece of luggage, the backpack; the heart of the bug-out bag.
This attitude of relentless improvement also applies to the load out that the BOB carries. No matter what you are planning to haul off into the post-apocalypse with you, there’s always a way to do it better.
You can lighten the load, make it more efficient, easier to access, easier to use. You can add capability, add redundancy. You can get rid of things that are annoying, and change things so they are labor-saving.
Don’t ever accuse someone of being a primadonna because they are complaining about a hotspot from a strap or a noisy piece of gear; minor annoyances can turn into big problems when you’re crossing the 10- or 20-mile marker.
Bottom line, there is no reason to settle for ‘okay’, especially when dealing with that one piece of equipment you are counting on more than anything else to help you get through a crisis. In today’s article I will be telling you about 10 clever BOB upgrades you should employ.
Better Matters When It Counts
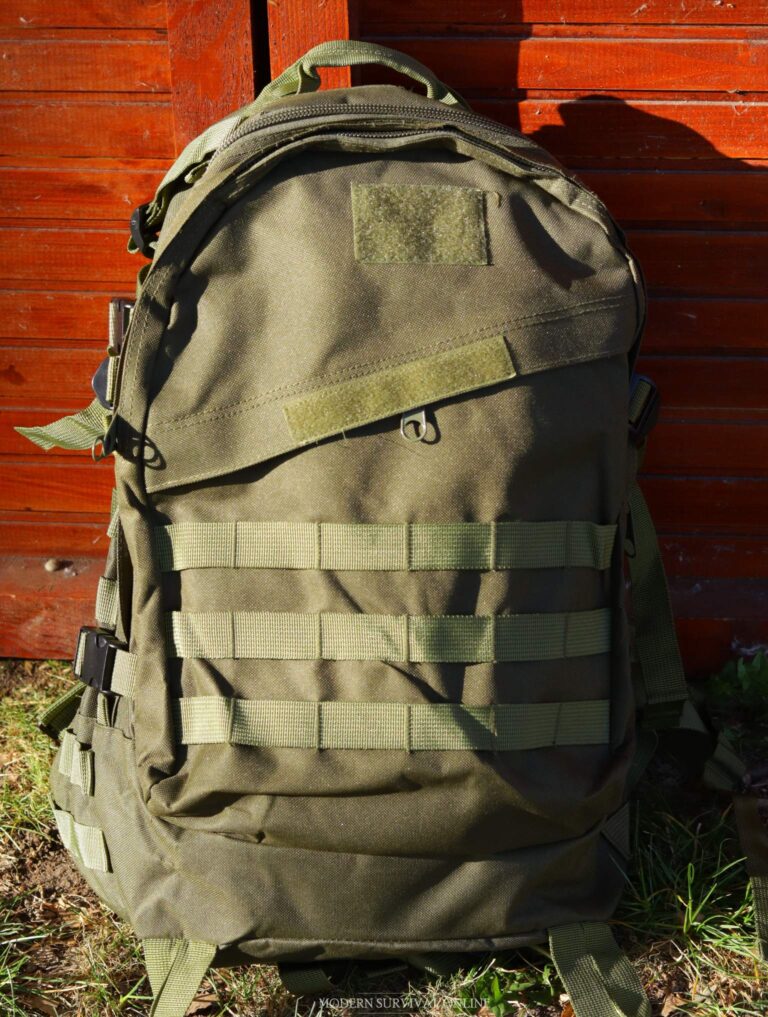
When it comes to backpacks the chief attributes that most preppers, and indeed, most people care about it’s simply ruggedness and capacity.
Those are, indeed, the two most important overall but how would one go about improving something like that?
For the average person it is impossible to effectively sew the rugged, synthetic material that most modern packs are made from.
Furthermore, you cannot add capacity in any meaningful way, aside from haphazardly hanging equipment from the outside of the pack.
And for that matter why should we concern ourselves to just those two attributes alone?
Are there not other qualities about our backpack, or the way we interact with our backpack that are important to us as preppers? I say yes, there certainly are.
Some of them are quite significant. Others are not, but still add up to a positive user experience by improving comfort, efficiency or some other intangible quality.
Performing one or two of the upgrades that I recommend might make a noticeable difference for you or it might not, depending on which upgrades you choose.
But I will bet that performing most or even all of them will significantly change your pack for the better, and more importantly will make the pack work better for you.
I will ask you only this one thing: don’t write off any of these performance enhancements on the list below as meaningless or not worth your time, no matter what kind of pack you have or how much you paid for it.
Remember what I said; no piece of gear, no matter how nice it is, is incapable of being improved upon. With that out of the way let us get to the list!
10 Clever BOB Upgrades to Employ
1. – Install Hydration Bladder
I don’t think I am going out on a limb when I guess that you probably have plenty of water to go along with your BOB, on top of the water filtration and sterilization equipment that you doubtlessly carry.
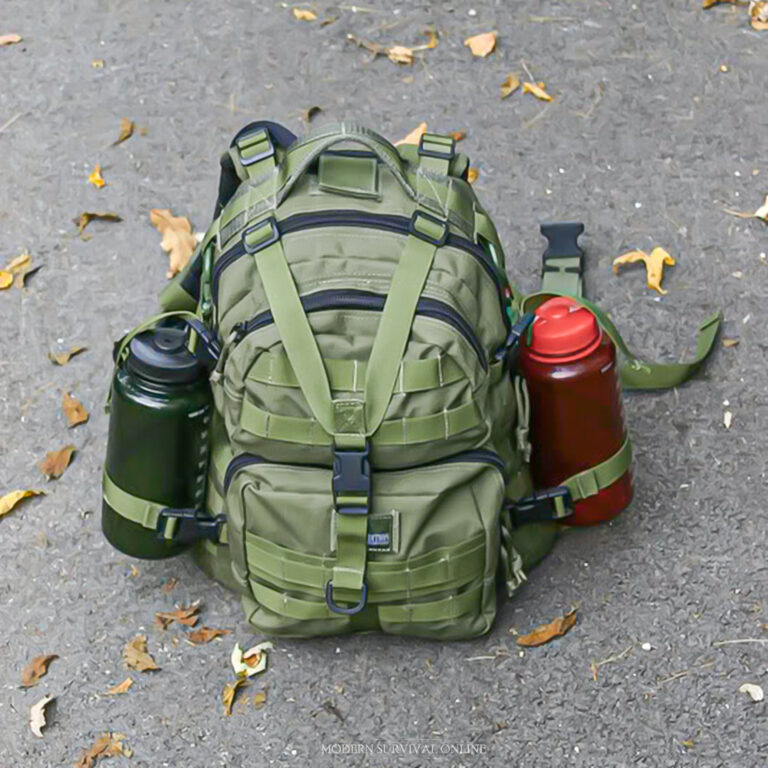
And if you are carrying any kind of backpack that is more advanced than the classic JanSport book bag, it likely has one, two or more water bottle pockets to keep your vital H2O close at hand.
Make no mistake, water is absolutely a survival imperative unless you live in a land of crystal clear streams and lakes. Otherwise you probably don’t want to take off into the wild blue yonder without it.
Nonetheless, there is a better way to access your water than stopping to pull out your water bottle or fumbling to fish it out of its holder while you are on the move. That “better way” is a hydration bladder.
Chances are you have already seen these compact, flexible pouches that have a long drinking straw held in an equally flexible or articulated tube.
First popularized by Camelback and later copied by dozens manufacturers, these are the ultimate in on foot drinking convenience.
While they might be a minor pain to keep clean, and no one likes having to fish them out of the pack to refill them, the ability to keep several liters or even a gallon or more of water in a ready-to-drink state is a major labor and aggravation saver when you are hauling a backpack that weighs 30, 40 or even 50 plus pounds.
Most modern backpacks built for hiking or tactical purposes will have a compartment or a pouch on the inside that is ready-made to accept a hydration bladder, but if your pack does not, it is fairly easy to add a divider or install a pouch on the inside for the purpose.
This is a quick and easy upgrade that will enable you to hydrate on the move simply and rapidly, saving you time and effort.
2. – Water Resistant Coating / Cover
It will never fail but every time you go to do a practice bug out, a pleasure hike, or just scout one of your routes the “fun” way the weather will be so nice it will be selfie-worthy.
But the moment you need to don your BOB and start hauling it across creation for real, it will be raining cats and dogs.
Even if it isn’t raining, you can depend on coming across some sort of wet conditions that will imperil your BOB, perhaps crossing a stream or a canal. Never trust a forecast, never trust a meteorologist!
The point of all this is, of course, to say that your BOB is going to get wet, and if your BOB gets wet the things inside it will get wet.
When it is raining really hard or you are risking a dunk into a deep body of water, your BOB and everything in it will become completely inundated.
This will certainly make your BOB heavier, as the fabric will absorb water and take time to dry out, but even more importantly is it the contents will risk ruination depending on what you are carrying. This is a double whammy you definitely don’t want when you’re bugging out for real.
The consequences could mean loss of critical items: food, possibly, electronics, certainly, paper, forget about it. Not good at all. Even what gear you carry that will not be destroyed outright by water can be degraded by it, or insidiously ruined.
Uncoated metals, especially those with high carbon content, will begin rusting promptly, especially if exposed to saltwater or water that is highly acidic.
Things like clothing will stay sodden for a long time until assiduously dried out, and mold will be a problem if you go too long without doing so.
The obvious solution, of course, is to waterproof your pack in some way. Many high-end, modern backpacks feature water-resistant or even completely waterproof construction in the form of modern synthetic fabrics and advanced coatings.
Simpler and, possibly, more effective methods for waterproofing are additional equipment like a rain cover or rain fly. There are even DIY waterproofing lotions and waxes that can see your pack beading off water like a duck.
A “nuclear option” is to carry a folded or rolled dry bag, another piece of luggage that is designed to completely waterproof the contents, and place your BOB into it when making a river crossing or similarly wet endeavor.
3. – Add External Storage
If there is one thing you definitely don’t want to do with any backpack but especially with your BOB, it is hang a whole bunch of equipment to the outside, left to sway and clank in the breeze for the duration of your travels.
Aside from being inefficient and unbalancing the pack, it is oftentimes unnecessary. If you find yourself constantly strapping gear to external attachment points, perhaps consider upgrading your backpack to a model with more capacity.
That being said, it is often smart to selectively add compact, purpose-driven external storage to your backpack in the form of small patches on the shoulder straps, waist belt, and even on the lid or flap of your backpack for tools that you use regularly or often while on the move.
If the alternative is to stuff these things into your pockets or take off the backpack to fish them out, why not, instead, make the pack work for you in this way by placing these items within easy reach while keeping them off of your body?
Ideal candidates for placing in small pouches on the outside of your backpack include tools you will need commonly or often while on the trail. Think things like maps, compasses, multi tools are Swiss Army knives, flashlights, radios and so forth.
In making use of this improvement you can keep your tools close at hand, out of your pockets and save effort and time when you need to access them. Get the job done, put them away and keep moving!
4. – Make it Lighter
The sagest piece of advice you will get from veteran preppers and recreational backpackers alike is to cut weight wherever possible.
The old military adage, long a cliché by now, says “ounces make pounds and pounds make pain”, and is very much true.
Even if you are using the most modern backpack possible, one made from feather-light but ultra-strong materials, and you have splurged on the lightest possible gear that money can buy, you should still be looking for ways to cut every ounce you can from your load unless it is absolutely necessary.
Of course, if you aren’t using the lightest backpack and gear available, you will probably find it easy to drop a pound here, two pounds there and so forth. At least at first…
Begin with your load out. Go over it again and again discarding anything that is not totally essential or extraordinarily useful.
Any specialized tool or any tool that cannot do more than one job should be cut unless it is essential to your objectives.
After you have trimmed all the fat you can, review the list again and look for items that can be taken out and replaced with a single multi-purpose item.
Also, be ruthless: if anything is simply too heavy, get rid of it unless it is completely vital.
As a last resort, consider replacing any vital piece of gear or even the pack itself with a superior upgrade that is drastically lighter while maintaining its capability.
Obviously this is expensive, and I will rarely recommend hardware solutions to problems that can be solved by better procedure, but there is just no comparison between an old school leather or heavy canvas backpack, and one made from the most sophisticated in modern nylon blends.
It is entirely possible to shave five pounds or more off of an average BOB, and for some of you packrat preppers you could trim off 10 or even 20!
Stop to consider that the weight you are hauling down your bug-out route will start to feel geometrically heavier the longer you carry it, and the more exhausted you become and you will find this upgrade more than worthwhile.
5. – Go Modular
One of my favorite BOB upgrades that I admittedly took quite a while to warm to is modularization.
Modularization is a concept, a type of packing procedure, where about you place the contents of your BOB into smaller, individual units using pouches, compartments and other removable inserts that will keep items of a like nature or similar purpose bundled together for easy deployment, easy packing and, just as importantly, easy accountability.
As an example, let’s say you are settling down to start making camp. Instead of looking in two or three different compartments on the inside and outside of your bag to collect your matches, your lighter, your fire starter, your tinder or whatever else you use to start a fire you would pull out a single pouch, easily identifiable, that contains your primary fire starting gear.
You can have a similar couch made up for your trail tools consisting of a small hatchet, folding saw and so forth.
You can use almost any kind of pouch or container for the purpose so long as it is reasonably light and durable. I have seen folks use everything from MOLLE pouches to heavy-duty plastic freezer bags.
There is a small trade-off when you decide to modularize your BOB, however. Most people will find it entirely worthwhile no matter how small and how light your individual containers are but they will still take up a little bit of room and a marginal amount of weight from your total capacity.
That being said, the sheer convenience and ease of use of this method makes the choice clear for me, and please believe me when I say I think it will work well for you too!
6. – Upgrade Straps and Frame
This upgrade is especially salient for those who choose a BOB that has an internal or external frame, but it still applies to any backpack of any kind.
Perhaps the most important components of any backpack are those that actually come in contact with your body, and those that help to control and stabilize the load that it carries.
Subpar padding, thin, chafing straps and annoying waist belts are chief offenders here, as are bulky, heavy external frames and flimsy internal frames.
Let’s start with the straps and belts.
If you notice that your backpack straps are constantly skidding around, chafing you, creating hotspots, and generally just being a huge pain in the ass, or the waist belt never seems to stay tight and afford the pack any extra stability you should consider upgrading them with an aftermarket model, or even a custom upgrade if you know any local shops that can handle sewing on nylon.
Recall when I said above that any annoyance at the beginning of your travels will slowly metamorphosize into an absolutely hellish experience near the end.
For those of you carrying backpacks designed for moving seriously heavy loads, backpacks that typically have a frame of some type be it internal or external, you should assess it critically.
If the frame is not doing its job of lending the pack rigidity and stability, you should upgrade. Many lower-end packs with an internal frame are notorious for having that frame or liner be damn near worthless.
Many companies make aftermarket upgrade frames, and with a little DIY ingenuity it is entirely possible to fabricate your own if you can’t find one that serves our purposes.
7. – Go Silent
This is one upgrade that anyone can do with a little bit of time and effort, no money required! Most preppers, no matter how tightly they pack the contents of their BOBs, will wind up with a backpack that sounds a little bit like a carnival caravan; lots of clanking, banging, tinkling, rattling and jingling.
For any of our readers out there who served in combat arms while in the military, there are probably cringing at that idea. That is because they know the value of noise discipline as it pertains to one’s personal gear!
You might think it is laughable, but please believe me when I say that failing to rigorously enforce noise discipline while in a serious survival situation could result in your death or the deaths of the people you care about.
This is not just a concern for door kicking infantry and super-sneaky Special Forces types!
Aside from being annoying to listen to for 8 to 12 hours a day, the noise that your pack creates could attract attention from people who mean you harm, or just have bad intentions for you.
The constant noise created by the pack also stifles your own hearing, one of your most important senses, and the one that may very well be responsible for tipping you off to lurking danger.
The quieter you can make your BOB, the better. Dead silence is the standard; ideally you don’t want to hear anything but the straps creaking.
To accomplish this, it is necessary to wear your backpack as you have it packed and then periodically take it off to insulate, wrap, isolate and otherwise stifle the gear within until nothing is rubbing, grinding or banging into the items around it in a noisy fashion.
It is mildly laborious, but completely within the grasp of any prepper, and something you should definitely do.
Once you have the packing order figured out, commit it to memory and practice so you can stow your gear the same way every time even while in a hurry. Pretty soon you’ll be moving through the wilderness with cat-like tread.
8. – Protect and Streamline Your Electronics
Unless you are an acetic or a really old school prepper there are probably some electronic devices you rely on as part of your bug-out gear.
It definitely makes sense and I am all for it, especially with the ready and inexpensive availability of off-grid power supply and storage technology.
But if you are relying on these modern devices to help you survive you should expect them to work as easily and as effortlessly as anything else you are carrying.
You must also take the time to ensure that they are protected against moisture, shock, and other misfortune.
Also keep in mind that your average bad guy in this era is significantly more technologically savvy than eras passed.
They might not be able to drive a stick shift, but many of them are surprisingly adept at turning electronic signals and electronic device vulnerability to their advantage. This is another source of worry for the switched-on prepper.
For this reason, you should take the time to physically and electronically protect your high-tech devices, and also set up your BOB and the power supply gear that it carries to serve you even while you’re on the move.
Water obviously is a constant enemy of electronics, as is damage from impact, the kind that is likely to suffer when you take a tumble, slip or fall. Invest in modern cases that are both waterproof and lined with impact-absorbing foam to keep your electronic gadgets safe until you need them.
A signal blocking bag, sometimes called a Faraday bag, is another good upgrade that can prevent unwanted attention from those who are trying to track you using the signals your device emits. This will obviously interfere with any outgoing signals or signals you want to receive, however.
Lastly, consider stowing your power banks or charging systems in a dedicated pouch and then running their cable along the outside of the bag to the pocket where you have your electronic device stored. This allows them to remain fully charged or to recharge while you’re on the move.
9. – Attach External Solar Cell
Since we’re on the topic of electronics, it is a perfect time to bring up the efficiency and the sheer handiness of modern solar charging systems.
These are absolutely ideal for preppers, being both lightweight, highly effective and durable enough for primetime use in the field. These things just keep getting better.
So long as you have a clear view to the sky and the sun is out, you can use these ingenious little kits to turn the sun’s radiation into electricity for all of your mobile devices.
The trick is that these things are typically used when you are stopped, and ideally employed when you can face them perpendicular and square to the incoming rays from the sun.
That is definitely what I would recommend you do whenever you can, but there is no reason why you can’t settle for less electricity that you otherwise wouldn’t be getting while you’re on the move.
By home-brewing some external attachment points, bungee cords and other ubiquitous field load carriage staples together you can splay the solar cell out on top of your pack while you are on the move, allowing it to grab a few extra watts of electricity on the go.
Every little bit helps, especially when you are using your electronics heavily!
10. – Have Backups
I know it wasn’t long ago in this article that I just got done telling you to ruthlessly purge any wasted weight that you could in quest of making your backpack as light as possible.
I stand by that statement, but I also stand by the statement that redundancy might save your life in an emergency.
Some items are so important, so elemental and so essential to the tasks of survival it is more than worth carrying two, perhaps even three of them.
The good news is that most of these items I’m referring to are already highly compact and weigh very little, meaning you have little excuse for not carrying a backup with you.
Great examples of items that fall into this category include water filtration equipment, medical supplies, fire starting material and tinder, a button compass, spare batteries and so forth.
Also don’t assume you have to carry an exact duplicate of an item so long as you can duplicate its capability.
For instance, having a metal vessel that allows you to boil water is important not only for cooking but also for sterilizing your water by killing any germs that might be hiding within.
You don’t necessarily have to carry a spare cup or small pot if you use a stainless steel water bottle that has no coating on the inside, allowing you to put it directly over or even in the fire.
With just a little diligent thinking you can probably think of several items that can pinch-hit in similar circumstances.
Conclusion
Just because you are happy with your BOB, and think it is good or even great does not mean that it cannot be improved.
It can be made lighter and better in a host of ways, and the increase in efficiency and comfort will translate into time and energy savings in the field when you need it the most.
Every ounce of weight you save and every task that is made easier or quicker will save you precious time and energy while in the field.
Like what you read?
Then you're gonna love my free PDF, 20 common survival items, 20 uncommon survival uses for each. That's 400 total uses for these dirt-cheap little items!
We will not spam you.