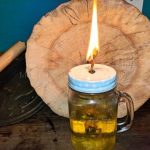
DIY Oil Lamp Instructions
Equipment
- Hammer
Ingredients
- 1 Mason jar
- 1 Mason jar lid
- 1 Mason jar ring
- Olive oil
- Scissors
- Cotton, cording, or other suggested wick material
- Nail
- Vice, two bricks, or two blocks of wood
- Washer, nut, or piece of cork
Instructions
- Put the Mason jar lid in a vise or upside down between two bricks or pieces of wood so the center area is exposed.
- Use the hammer and nail (or a power drill and a bit if you prefer) to punch a hole in the middle of the Mason jar lid large enough for your wick to fit through.
- Set the lid aside and remove the tools from your workspace.
- Slide the wick through the hole so the top end is sticking out. I suggest temporarily taping the wick in place so it does not fall back inside when being placed in the DIY oil lamp or unravel while during placement.
- Fill the glass jar with your chosen lamp oil.For the best results, fill the jar only a little more than ¾ of the way full. I recommend using olive oil.
- Tie the washer or nut around the bottom end of the wick.
- Gently place the lid with the wick through it into the DIY oil lamp container. Line the weighted bottom up so it is as centered as possible in the base of the Mason jar. I suggest keeping your thumb on the taped portion of the top of the wick to make sure it stays secured in place.
- Screw the ring onto the Mason jar around the lid while holding the top of the wick firmly in place.
Notes
Allow the wick to soak up the oil for at least 15 minutes before lighting for the first time. You can use the oil lamp just as it is, or dress them up a bit with essential oils, herbs, cinnamon sticks, or pine cones and use them as attractively disguised prepper gear around the house.
