
You’ve probably already read my review of the Paladin Go Bag and my use of it as an emergency roadside toolkit. In all honesty, an emergency roadside toolkit is completely worthless, unless you know how to use it. Today we’ll discuss a few problems which may occur while on the road, and how to correct them until you can get your vehicle home or to a service station.
These instructions can be useful in normal circumstances, as well as in a disaster situation. At the least, they will save you the cost of a tow, in a disaster/bug-out situation these instructions could save your life.
You will find several safety warnings throughout this article, however, I’d like to start with a few disclaimers. This is not an auto repair for dummies article. If you know nothing about cars whatsoever, and can’t tell the difference between an alternator and a starter, stop reading right here.
Seriously, stop. If you don’t know the basics of how a motor vehicle works under the hood, the information in this article, if used incorrectly, can seriously injure or possibly kill you.
If you do not understand what part of your vehicle is being discussed, once again, then you should not attempt emergency repairs yourself. I am a hobbyist, not a certified mechanic, so I can not guarantee the accuracy of this information.
Use common sense, and if something is beyond your capability, do not attempt it. Furthermore, neither of these fixes are permanent, and the appropriate parts should be replaced prior to further use.
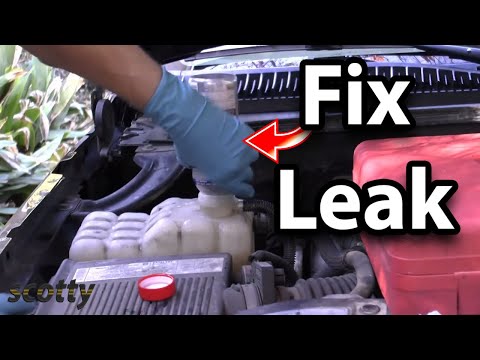
Temporarily Fixing a Leaking Radiator / Hose
It’s bound to happen to all of us at some point. We’re driving along the road, when suddenly the car is filled with the smell of antifreeze and you see steam coming out of the hood.
Important Note: Know the difference between steam and smoke. If you smell smoke coming out of the vents or engine compartment, you may have an engine fire. Stop the car IMMEDIATELY, turn off the engine, get out, and DO NOT open the hood, as this will only supply additional oxygen to the fire.
First of all, pull off to the side of the road as soon as safely possible, and turn off the vehicle. If you are unable to pull off immediately, wind down your window and turn your heater on maximum strength until you can turn the vehicle off. The reason for this is that if your heater is on, heat is being diverted away from the engine and into the car itself, helping to prevent the engine from overheating.
Warning: Steam and hot antifreeze can BURN. Make sure you have protection from direct skin contact.
Once your vehicle has pulled off to the side of the road and been turned off, open your hood, if possible. You should use a glove or rag to open the hood safety catch, as there is a good chance the safety catch has been covered in antifreeze. Leave your vehicle’s hood open, and allow the engine and radiator to cool.
When the engine and radiator are cool enough to touch, it’s important to identify the source of the fluid leak. With the hood still open (and no-one near the engine compartment) turn the car back on, then slowly approach the engine compartment and identify the source of the leak. This could be a radiator hose, or a hole in the radiator itself.
Once you have identified the leak location, turn the vehicle off and allow it to cool again. Check your radiator fluid level. If you have lost a significant amount, it will be necessary to replace the lost fluid if you have more than 5 miles to travel. Distilled water is also an ideal emergency coolant for temperatures above freezing.
Make sure you use distilled water, as the minerals in spring water or drinking water may corrode your coolant system, but can be used in a pinch. Just make sure you flush your coolant system after you’re done.
Now, time to patch that leak. If the leak is in your radiator itself, there’s not a whole lot you can do without a welder. If you carry a welder in your vehicle properly grounded to allow you to weld your vehicle, then your mechanical knowledge is vastly superior to mine and no doubt you already know how to fix this. If you do not have a welder, it’s best not to attempt to patch the radiator.
You might be able to use epoxy to patch the radiator, but I have never tried it, and not only will the patch probably not hold, but will probably ruin your entire cooling system (radiator and water pump) should any of the epoxy come loose and enter the system. Lead solder will not work, as it has too low a melting point. Tape is going to melt and/or catch fire.
If your leak is in one of the hoses, you can apply a temporary patch using duct tape or electrical tape. Make sure your provide plenty of overlap, and tape at least 1 inch beyond the extend of the hole. It is important to note that this patch will not hold under high pressure, so it is imperative to follow the next step.
Warning: Do not attempt to open your radiator cap with your bare hand, as it may still be hot, and will burn you!
Once you have applied a temporary patch (if possible), the next step is to reduce the pressure inside your coolant system. The cooling system on most engines is a closed system, meaning that the radiator fluid is under pressure as it is circulated.
Radiator caps are designed so that you can loosen the cap without allowing it to come off. By loosening the cap, your cooling system is no longer under pressure and will not leak as quickly.
However, should your engine become rather hot, you will begin to loose radiator fluid through the top of the radiator, so it’s important to keep an eye on your temperature gauge, if you have one. If your vehicle starts to overheat, turn it off, check your patch, let it cool, then add more fluid and keep going.
No Start / No Crank Scenario
There are many causes for why an engine might not start. However, there are also several methods for starting the engine in a pinch. Here is a step by step on how to try to get your engine started.
First, you need to determine if the no start condition is due to a dead battery. Do your headlights AND interior lights work? If neither work, or are extremely faint, then your battery is dead, and will need to be jump started. Depending on your transmission and fuel injection system (only manual transmissions work without electronic fuel injection normally work), it is possible to push start or drift start the vehicle.

Turn the vehicle on, and put the vehicle in second gear, hold down the clutch, and get the vehicle moving forward by having someone help push or drift downhill. Once the vehicle is going about 5 mph, release the clutch, and should the engine start, immediately push the clutch back in so the engine does not stall.
If both sets of lights work, or one works but not the other, you may have a short in your electrical system, resulting in one or more blown fuses. This is an easy fix, even if you don’t have any spare fuses.
This is where a multi-meter comes in handy, as most automotive fuses have two terminals which you can use to quickly check for the blown fuse. Just make sure your engine is off first.
Find the blown fuse, and replace it with another fuse with the same amp rating. Make sure you place the blown fuse in the good fuse’s location, and don’t remember to replace the bad fuse once you have a replacement.
In the process, you will be disabling another part of your electrical system, such as the radio or power windows. A small sacrifice for being able to get your vehicle started again.
If your vehicle’s electrical system is fine and you have no blown fuses, then the starter is most likely beginning to go bad. Using an assistant, one person will need to gently but firmly beat on the starter with a hammer or large wrench while the other person attempts to start the vehicle.
Make sure the vehicle’s emergency brake is on, so that the person under the vehicle is not accidentally crushed. This works by breaking loose the corrosion which may have been keeping the starter from turning.
Once you get your engine running, don’t turn it off, and drive directly to your home or other location you can work on the vehicle.

Like what you read?
Then you're gonna love my free PDF, 20 common survival items, 20 uncommon survival uses for each. That's 400 total uses for these dirt-cheap little items!
We will not spam you.
I just realized I made a typo in the article.
“Make sure you place the blown fuse in the good fuse’s location, and don’t remember to replace the bad fuse once you have a replacement.”
Should be…
“Make sure you place the blown fuse in the good fuse’s location, and remember to replace the bad fuse once you have a replacement.”
Although, I am frequently guilty of performing activities in accordance with the original statement.
Ken
Ken –
Your not alone in that one. – Rourke
Very good post.
Sundance,
Thanks a lot!
Unfortunately, this is all knowledge from experience, not just book knowledge. I’d love to say that I’ve never had to use it.
Ken
I have used standard JB Weld on 2 different radiators, and the patches held up for longer than 2 years in each case, with the vehicles being sold and still working fine. You do have to let it dry for 24 hours, and the quickset variety might not work for high heat applications. Just want to pass this info along.